| “This site contains affiliate links for which OEMDTC may be compensated” |
NHTSA Campaign Number: 17V001
Manufacturer Volkswagen Group of America, Inc.
Components VISIBILITY, AIR BAGS
Potential Number of Units Affected 234,057
Air Bag Inflator may Rupture due to Corrosion
An inflator rupture may result in metal fragments striking the driver or other occupants resulting in serious injury or death.
Summary
Volkswagen Group of America, Inc. (Volkswagen) is recalling certain 2011-2017 Audi Q5 vehicles.
The sunroof drainage system may allow water to soak into the foam surrounding the side head air bag inflator canister resulting in the corrosion of the canister.
If this happens, the corrosion can weaken the canister and the inflator could fracture without air bag deployment, propelling fragments into the passenger compartment, striking and causing serious injury to vehicle occupants.
Remedy
Audi will notify owners, and dealers will inspect the inflator and either coat it or replace it, as necessary, after removing the surrounding foam, free of charge.
The recall is expected to began March 2017.
Owners may contact Audi customer service at 1-800-253-2834.
Volkswagen’s number for this recall is 69P1.
Notes
Owners may also contact the National Highway Traffic Safety Administration Vehicle Safety Hotline at 1-888-327-4236 (TTY 1-800-424-9153), or go to www.safercar.gov.
Check if your Audi has a Recall
Date: January 30, 2017
To: Audi Dealer Principal, Service Manager, Warranty Administrator, Sales Manager & Parts Manager, General Manager
From: Audi Customer Protection
Subject: Advance Notice Safety Recall 69P1 – Head Curtain Airbag Canister Certain 2011-2017 Model Year Audi Q5 with Panoramic Sunroof
Audi has notified NHTSA and Transport Canada about the upcoming safety recall described in this letter.
| CODE | 69P1 |
| AFFECTED VEHICLES | Certain 2011-2017 Model Year Audi Q5 with Panoramic Sunroof |
| RECALL DESCRIPTION | If the water drainage system of the panoramic sunroof becomes damaged or impaired (such as during a repair), water could enter the side head curtain airbag canister. Due to a foam that is touching the airbag inflator, moisture could cause corrosion on the airbag inflator over time. If this happens, the airbag canister could fracture without airbag deployment, propelling fragments into the passenger compartment, striking and causing serious injury to vehicle occupants. |
| PRECAUTIONS | Owners are advised that passengers should not use the second row seating until this recall repair has been performed.
If any evidence of a water leak is visible on the headliner inside of the vehicle, owners are advised to contact their nearest authorized dealer or qualified workshop without delay in order to have the vehicle inspected |
| CORRECTIVE ACTION | Inspect vehicle for evidence of water ingress, examination of drainage system, disassembly of headliner and trim. Remove foam and inspect side head curtain airbag canister for relevant corrosion.
|
| REPAIR INFORMATION | On or about February 1, 2017 affected vehicles will be identified in ELSA and VIN lookup.
Repair information will be provided to dealers when parts and repair instructions become available to support this recall. |
If you have any questions or require additional assistance, please contact Warranty. As always, any press inquiries should be directed to Audi Public Relations.
Audi Customer Protection
Safety Recall
Code: 69P1
REVISION
| Subject | Head Curtain Airbag Canister |
| Release Date | February 07, 2017 |
| Revision Summary | Work procedure updated. |
| Affected Vehicles | U.S.A. & CANADA: Certain 2011-2017 MY Audi Q5 with Panoramic Sunroof
Check Campaigns/Actions screen in Elsa on the day of repair to verify that a VIN qualifies for repair under this action. Elsa is the only valid campaign inquiry & verification source.
|
| Problem Description | If the water drainage system of the sunroof becomes damaged or impaired (such as during a repair), water could saturate the foam around a side head curtain airbag canister. This could cause corrosion to form on the canister over time. If this happens, the canister could fracture without airbag deployment, propelling fragments into the passenger compartment, striking and causing serious injury to vehicle occupants. |
| Corrective Action | Inspect vehicle for evidence of water ingress, examination of drainage system, disassembly of headliner and trim. Remove foam and inspect side head curtain airbag canister for relevant corrosion.
Please be aware that repair under this recall is limited to the head curtain airbag canister only. Repairs required to address damage to any other vehicle components resulting from existing or former water ingress issue(s) are not covered under this recall. |
| Precautions | Owners are advised that passengers should not use the second row seating until this recall repair has been performed. If any evidence of a water leak is visible on the headliner or in the rear of the vehicle, owners are advised to contact their nearest authorized dealer without delay in order to have the vehicle inspected. |
| Code Visibility | On or about February 02, 2017, affected vehicles were listed on the Inventory Vehicle Open Campaign Action report under My Dealership Reports (found on www.accessaudi.com & OMD Web). A list was not posted for dealers who did not have any affected vehicles.
On or about February 02, 2017, this campaign code showed open on affected vehicles in Elsa. On or about February 02, 2017, affected vehicles were identified with this campaign code in the VIN Lookup tool at www.audiusa.com and on the NHTSA VIN lookup tool at www.safercar.gov. |
| Owner Notification | Owner notification will take place in March 2017. |
| Additional Information | Please alert everyone in your dealership about this action, including Sales, Service, Parts and Accounting personnel. Contact Warranty if you have any questions.
IMPORTANT REMINDER ON VEHICLES AFFECTED BY SAFETY & COMPLIANCE RECALLS New Vehicles in Dealer Inventory: It is a violation of Federal law for a dealer to deliver a new motor vehicle or any new or used item of motor vehicle equipment (including a tire) covered by this notification under a sale or lease until the defect or noncompliance is remedied. By law, dealers must correct, prior to delivery for sale or lease, any vehicle that fails to comply with an applicable Federal Motor Vehicle Safety Standard or that contains a defect relating to motor vehicle safety. Pre-Owned Vehicles in Dealer Inventory: Dealers should not deliver any pre-owned vehicles in their inventory which are involved in a safety or compliance recall until the defect has been remedied. Dealers must ensure that every affected inventory vehicle has this campaign completed before delivery to consumers. |
| Claim Entry Instructions
After campaign has been completed, enter claim as soon as possible to help prevent work from being duplicated elsewhere. Attach the Elsa screen print showing action open on the day of repair to the repair order. If customer refused campaign work:
| |||||||
| Service Number | 69P1 | ||||||
| Damage Code | 0099 | ||||||
| Parts Vendor Code | 002 | ||||||
| Claim Type | Sold vehicle: 7 10
Unsold vehicle: 7 90 | ||||||
| Causal Indicator | Mark labor as causal | ||||||
| Vehicle Wash/Loaner | Do not claim wash/loaner under this action | ||||||
| Criteria I.D. | 8R | ||||||
| Inspect head curtain airbag inflator canisters and install protective wax (ISI Automotive airbag inflator canister)
Labor operation: 6961 00 99 100 T.U.
-OR-
Inspect head curtain airbag inflator canisters, no wax required (Autoliv airbag inflator canister)
Labor operation: 0183 00 99 90 T.U.
| |||||||
Campaign Work Procedure
69P1 Safety Recall
| NOTE |
|
Required Parts
| Criteria | Quantity | Part Number | Part Description |
|---|---|---|---|
| 8R | 1 | D 308 SP5 A1 | Protective Wax |
Required Tools
- Pry Lever -80-200- (or equivalent)

- Pry Lever -80-200- (or equivalent)

- Applicator Brush (locally sourced, shop supply)

- Omega Clip Tool –T40280- (or equivalent)

Section A – Check for Previous Repair
- Enter the VIN in Elsa and proceed to the “Campaign/Action” screen.
| TIP |
| On the date of repair, print this screen and keep a copy with the repair order. |
- Confirm the Campaign/Action is open <arrow 1>. If the status is closed, no further work is required.
- Note the Applicable Criteria ID <arrow 2> for use in determining the correct work to be done and corresponding parts associated.

Proceed to Section B
Section B – Repair Procedure, Removal of Headliner Trim for Inspection of Head Curtain Airbag Inflator and Installation of Protective Wax.
| NOTE |
|
| CAUTION |
| Accident risk.
When working on pyrotechnic components (for example the airbag, belt tensioner), it is necessary to disconnect the battery with the ignition turned ON. |
- The Service Writer, Service Manager and/or Warranty Administrator will need to check the following prior to beginning water ingress inspections:
- Check for Warranty Key U98 (U.S.) or contract type CANAU-CAMP69P1 (CAN) in the vehicle data section of Elsa and follow instructions.
- If warranty key U98 (U.S.) or contract type CANAU-CAMP-69P1 (CAN) is not present continue with water ingress inspection.
Water Ingress Inspection:
- Open the rear doors of the vehicle and inspect the headliner on both sides of the vehicle for water ingress on the rear area of the headliner <A> near the D-pillar trim.
| DANGER |
| If, at ANY time during the water ingress inspection, evidence of prior water ingress is noted, proceed to inflator canister inspection with extreme caution. |
- If no water ingress is noted on either side, proceed to the next step.

- Remove the left and right rear luggage compartment trim panel inserts.
- Disconnect the 12V outlet on the right side luggage compartment insert (if equipped).
- Inspect the wheel well areas for any signs of water ingress.
| DANGER |
| If, at ANY time during the water ingress inspection, evidence of prior water ingress is noted, proceed to inflator canister inspection with extreme caution. |
- If no water ingress is noted, proceed to the next step.


| NOTE |
| Disconnect the battery ground cable with the ignition turned on. |
| DANGER |
| If, at ANY time during the water ingress inspection, evidence of prior water ingress is noted, proceed to inflator canister inspection with extreme caution. |
- Turn the vehicle ignition to the ON position.
- Remove the luggage compartment floor covering <3>.
- Remove the dirt tray, if applicable.
- If equipped, remove the subwoofer <2>.
- Remove the spare tire.
- Fold back the carpet <1> over the cover.
- Inspect the spare tire well and surrounding areas for any signs of water ingress.
| DANGER |
| If, at ANY time during the water ingress inspection, evidence of prior water ingress is noted, proceed to inflator canister inspection with extreme caution. |
- If no water ingress is noted, proceed to the next step.

- Unlock the retaining tabs <arrows> and open the cover <1> and inspect the battery well for any water ingress.
| DANGER |
| If, at ANY time during the water ingress inspection, evidence of prior water ingress is noted, proceed to inflator canister inspection with extreme caution. |
- If no water ingress is noted, proceed to the next step.

- Open the cover <1> over the battery negative terminal.
- Loosen the nut on the negative terminal several turns and remove the battery ground cable <arrow> from the battery pole and isolate the ground cable.

- Carefully unclip the rear roof panel trim <1> in the center of the roof frame using the Pry Lever -80-200- and pull the rear roof trim off towards the rear in the direction of the <arrow>.
| DANGER |
| If, at ANY time during the water ingress inspection, evidence of prior water ingress is noted, proceed to inflator canister inspection with extreme caution. |

- Release the center rear headliner retaining clip using a small screwdriver to release the two tabs on either side of the clip.
| DANGER |
| If, at ANY time during the water ingress inspection, evidence of prior water ingress is noted, proceed to inflator canister inspection with extreme caution. |

- Remove the expanding clip rivet <1> by placing the pry lever -80-200- between the headliner and the sheet metal/body. Repeat for both sides.
| NOTE |
|
- Gently fold down the D-pillar trim and the corners of the headliner on the left and right side to gain visual access to the underside of the headliner and check for water ingress.

- Inspect the underside of the headliner on the left and right sides for evidence of water ingress, as shown, in the location indicated by the <arrows>.
| DANGER |
| If, at ANY time during the water ingress inspection, evidence of prior water ingress is noted, proceed to inflator canister inspection with extreme caution. |
- If no water ingress is noted, proceed to the next step.

| NOTE |
| The underside of the headliner will have adhesive spray in the areas shown <A>. Do not confuse the adhesive spray with water ingress. |

| DANGER |
| If ANY water ingress is noted on the headliner area around the panoramic sunroof or the areas highlighted on the headliner <B>, proceed to inflator canister inspection with extreme caution. |
| NOTE |
| The headliner in photograph <B> shows the headliner removed for visual clarity of water ingress. It is not necessary or required to remove the headliner for this procedure. |

- If NO evidence of water ingress has been noted during any of the above inspection procedures, continue to the next step.
- Lift the rear coat hook <1> slightly off the side trim panel using the Pry Lever -80 – 200- <arrow A> and then pull it off toward the rear <arrow B>.
- Remove the screw behind the rear coat hook from the luggage compartment trim panel.
- Repeat to remove both sides.

- Pull the release lever <1> and release the rear seat backrests on both sides. Fold both rear seats forward for additional clearance.
- Hold the release lever in the pulled position and remove the screw <3>.
- Repeat to remove both sides.

- Pull back the rubber sealing trim from around the left and right luggage compartment, Dpillar trim panel, and upper trim panel.
- Release the upper portion of the luggage compartment side trim panel <A> far enough that the luggage compartment side trim tabs <B> clear the openings in the D-pillar trim.
- Repeat to remove both sides.
| TIP |
| Place clean shop rags between the luggage compartment trim and the D-pillar trim to avoid scratching the D-pillar trim. |

- Press the cover toward the inside and remove the concealed screw securing the screen separator mount.
- Repeat to remove both sides.
| NOTE |
| The fastener under the screen separator mount flap is a T-45 Torx. |

- Remove the expanding clip rivet <1>.
- Remove the D-pillar trim <2> from the body <arrows> using the pry lever -80-200-.
- On versions with a speaker, disconnect the electrical connector.
- Repeat to remove both sides.
| NOTE |
| Use special tool -T40280- (or equivalent) to remove any trim clips that remain in the body. |

- Gently lower the headliner on the right and left sides to inspect the head curtain inflators <arrows> for corrosion. Pay particular attention to the areas that were covered by the foam block.


| DANGER |
| If corrosion is found: DO NOT attempt any further repair, diagnosis, inspection, or disruption of the airbag inflator canister or headliner if corrosion and/or pitting is found. Risk of rupture of the airbag inflator is possible. Rupture of the airbag inflator can cause serious injury or death. |
- If heavy corrosion and/or pitting is found as shown, STOP ALL FURTHER REPAIR OR INSPECTION. Create a Technical Assistance WEB ticket and follow the direction of the Technical Assistance Consultant. Do not continue with any further repair, diagnosis, inspection, or disruption of the airbag inflator canister or headliner.

- When creating the WEB ticket, be sure to enter a contact phone number at the bottom of the Technician’s Questionnaire.
The following photos are examples of unacceptable corrosion:


The following photos are examples of acceptable corrosion:


- If no corrosion was found, inspect the airbag inflator canisters for the manufacturer name on the airbag inflator canister.
- There are two manufacturers, “ISI Automotive”, and “Autoliv”.
- If the airbag inflator canister in the vehicle is WITHOUT corrosion and manufactured by “Autoliv”, Proceed to Section D to reinstall the removed trim. (“Autoliv” inflators do NOT require the application of the protective wax.)
- If the airbag inflator canister is WITHOUT corrosion and manufactured by “ISI Automotive”, Proceed to Section C and install the protective wax.

Section C – Repair Procedure, Remove Headliner Foam and Apply Protective Wax to ISI Automotive Head Curtain Airbag Inflator
- Remove and discard the foam padding from the headliner on the right and left side by gripping the foam padding with the fingers and peel the foam away from the headliner.


- Use a medium sized rag, or other material to cover the luggage compartment trim.
- Be sure the area is covered well enough to control and capture any drips that may occur during the application of the protective wax.

| WARNING |
| DO NOT remove the sticker tab from the airbag inflator canister part number sticker. The sticker and its tab are required. Fold the sticker tab out of the way if necessary to gain access around the sticker during application of the Protective Wax, but DO NOT remove the sticker tab. |
- Unclip the airbag electrical harness loom supports <A> from the retaining brackets to avoid getting the protective wax on the wiring harness using pry lever -80-200-.
- DO NOT unplug the connector from the airbag.

| CAUTION |
| DO NOT unplug the airbag electrical connector from the airbag inflator canister. It is only necessary to unclip the wiring harness loom supports <A> to avoid getting protective wax on the harness. |
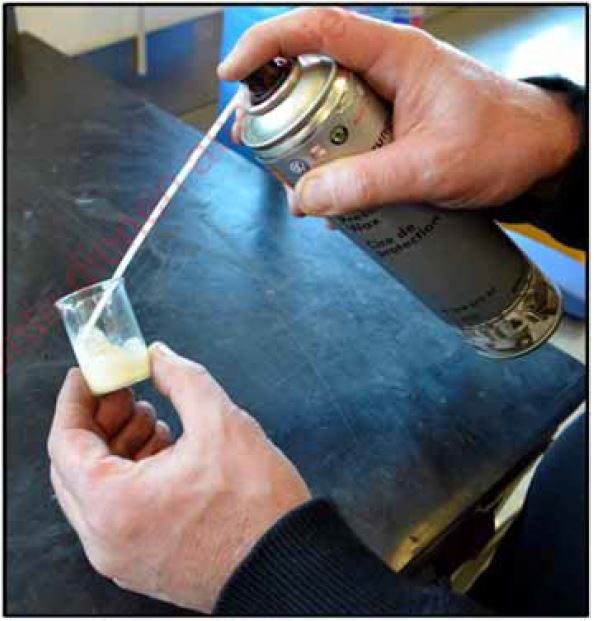
- Attach the spray nozzle included with Protective Wax -D 308 SP5 A1- to the spray can in place of the fan spray nozzle.
- Using a commercially available measuring beaker, or a small graduated cup (or equivalent) dispense a small amount of protective wax into a beaker. The protective wax will be equally applied to each airbag inflator canister.
 Airbag Canister - 2011-2017 Audi Q5 41">
| Part Number | Part Description |
| D 308 SP5 A1 | Protective Wax |
- Use the applicator brush to evenly apply the protective wax to each airbag inflator canister. Be certain to achieve complete coverage of the wax with the brush, paying attention to the back side of the canister, and in between the bracketing and fasteners.
- Always use a brush when applying the protective wax.
| WARNING |
| Never spray the protective wax directly onto the inflator. |
| WARNING |
| • Do not apply the wax to the igniter or airbag fabric <arrows>.
• Do not remove the airbag canister from the vehicle. |


- Allow five minutes of drying time for the protective wax. After the drying time has elapsed, use the applicator brush to smooth and even out any thick or thin points on the application, and remove any runs or drips.
- Reconnect the airbag electrical harness to the retaining loops.

Proceed to Section D.
Section D – Repair Procedure, Reinstall Rear Headliner Trim
- If equipped, reconnect the D-pillar trim speaker to the wiring harness connection.
- Reinstall the left and right D-pillar trim panels, and press on until the panel audibly latches.
- Reinstall the expanding clip rivets <1 and 3>.

| NOTE |
| When reinstalling the D-pillar trim, note the installed position of the clips as shown. The black clip <circle> is longer than the other two clips and must be installed in the position shown. |

- Mount the rear roof panel trim <1> so that the hooks touch the D-pillar trim.
- Position the rear roof panel trim on the pins, then press inward on the panel until the clips audibly engage.

- Reinstall the two left and right screen separator mounts and tighten the T-45 Torx screws to 9 Nm.

- Reinstall the luggage compartment side trim panels on the left and right sides and press on them in the direction of the arrows until they audibly latch <arrows A, B, and C>.
- Reinstall rubber sealing trim over the luggage compartment trim panels, the D-pillar trim panels, and the upper trim panel.

- Reinstall the screw behind the rear coat hook into the luggage compartment trim panel on the left and right sides.
- Reinstall the rear coat hook <1> by rotating the front of the coat hook into the panel <A>, then pressing forward and in until the rear coat hook latches audibly into place <B> for the left and right sides.

- Hold the release lever in the pulled position and reinstall the screw <3> and tighten to 1.5 Nm for both the left and right sides.
- Pull the release lever <1> and release and the rear seat backrest to verify operation of the backrest release cable and mechanism.

- Reinstall the left and right luggage compartment inserts.
- Reconnect the 12V outlet on the right side luggage compartment insert (if equipped).


- Make certain the ignition is ON before reattaching the battery ground cable.
- Disconnect the connector <2> from the Battery Monitoring Control Module J367 <3>.
- Connect the battery ground cable terminal by hand to the battery negative terminal and tighten the nut <1> to 5 Nm.
- Reconnect the connector to the Battery Monitoring Control Module J367 <2>.

- Fold closed and reattach the retaining tabs <arrows> for the battery cover <1>.

- Fold the carpet <1> back over the cover.
- Reinstall the spare tire.
- If equipped, reinstall the subwoofer <2>.
- Reinstall the dirt tray, if applicable.
- Reinstall the luggage compartment floor covering <3>.

- Turn the ignition OFF and back ON and start the vehicle and check for illumination of any fault lamps (example, SRS, check engine, etc).
Proceed to Section E.
Section E – Campaign Stamp
- Once the campaign has been completed, the technician should stamp the repair order.
- Stamps are available for ordering through the Compliance Label Ordering Portal.
Proceed to Section F.

Item#: AUD4927ENG
OR

Item # AUD4927FRE
ALL WORK IS COMPLETE
Appendix A – Warning and Safety Precautions
| WARNING |
General Safety Precautions when Working with Pyrotechnic Components:
|
 Loading...
Loading...
Loading...
Loading...
Loading...
